
Multi-Tenant SpringBoot application with Postgres shared Database and separate Schema base approach using Liquibase
Multi tenant applications need complex architecture to be able to sustain. Your application may have 1000s of Tenants which at one point of time seems very less count but if you store all their business related data in one place then, everytime you are going to perform an operation on one tenant’s data you have to be very careful with other one’s data. In this blog, we will learn How you can maintain all your tenant’s schema from one place of source and how to query them according to your API request.
Below are some technologies we will work with:
- Springboot 3+
- Java 17
- Postgres
- Liquibase
I hope that you already have Postgres up and running, you can install it or take help of Docker instance instead for that you can use below command(do not use it for production)
docker run --name postgresql -e POSTGRES_USER=myusername -e POSTGRES_PASSWORD=mypassword -p 5432:5432 -v /data:/var/lib/postgresql/data -d postgres
Let's start with Spring Boot project(I have used 3.1.0 for this blog), create new Springboot project from Spring initailizer as I am big fan of this web application although you can create springboot project from IntelliJ or any other IDE.
1. Import below dependencies in your pom.xml
<dependency>
        <groupId>org.springframework.boot</groupId>
        <artifactId>spring-boot-starter-web</artifactId>
</dependency>
<dependency>
        <groupId>org.springframework.boot</groupId>
        <artifactId>spring-boot-starter-data-jpa</artifactId>
</dependency>
<dependency>
        <groupId>org.postgresql</groupId>
        <artifactId>postgresql</artifactId>
        <scope>runtime</scope>
</dependency>
<dependency>
        <groupId>org.liquibase</groupId>
        <artifactId>liquibase-core</artifactId>
</dependency>
<dependency>
        <groupId>org.projectlombok</groupId>
        <artifactId>lombok</artifactId>
        <optional>true</optional>
</dependency>
2. Add properties in application.yaml file
spring:
    datasource:
        url: jdbc:postgresql://localhost:5432/postgres
        username: myusername
        password: mypassword
        driver-class-name: org.postgresql.Driver
    jpa:
        properties:
            format_sql: true
            jdbc:
                lob:
                non_contextual_creation: true
    liquibase:
        change-log: classpath:db/master.yaml
        enabled: true
3. Create master table where you can maintain all your schema related information with the help of Liquibase
a. Create folder structure called “db/changesets” under “resources” folder
b. Create “TenantGroup.yaml” file inside created folder with below code in it
databaseChangeLog:
    - changeSet:
        id: create-table-tenant-schema
        author: Sunit Kale
        changes:
        - createTable:
            tableName: tenant-schema
            columns:
                - column:
                    name: id
                    type: bigint
                    autoIncrement: true
                    constraints:
                    primaryKey: true
                - column:
                    name: tenant-name
                    type: varchar(255)
                    constraints:
                    nullable: false
                - column:
                    name: schema_name
                    type: varchar(255)
                    constraints:
                    nullable: false
                    unique: true
c. Create “master.yaml” file under “db” folder, don’t put inside changeset because we have given path like that in application.yaml file
d. Add below code in “master.yaml” file
databaseChangeLog:
    - include:
        file: db/changesets/TenantGroup.yaml
e. Now, run your application
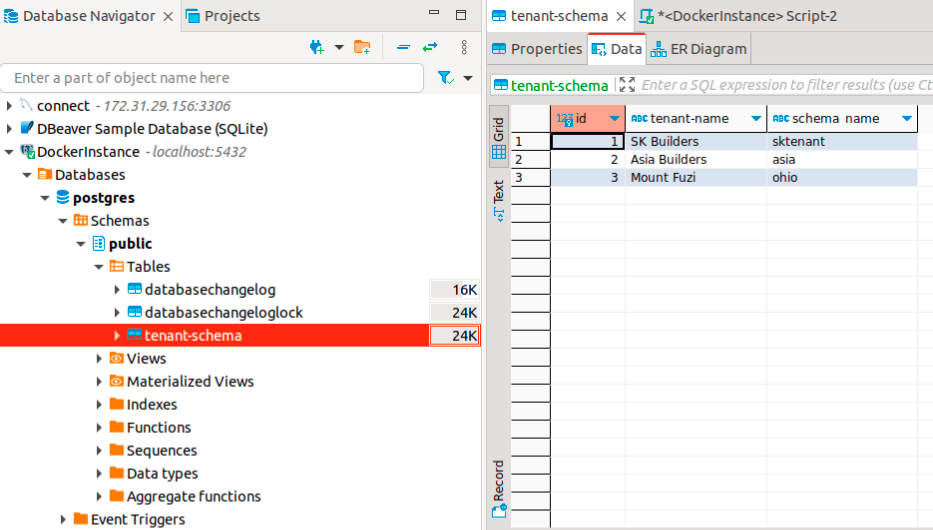
f. You will see logs related to Liquibase in console. If you go to your Database “Public” schema. There will be table 3 tables created automatically and one of them is “tenant-schema” for which we have written “Liquibase” script
4. Add some unique records in the table or You can create an API via Spring Boot.
I will not explain about it here for brevity. In your application you need to create “TenantGroup” entity and “TenantSchemaRepository” JpaRepository as we have to do next operation with them.
If you have connected your Database with DBever, you can see same thing as below but with your data records
Now, fun and complex part starts
Let's suppose your application is going to manage some Real-estate entities and all your schema must have table called “Building” table which store info like address, city, state, state, country, zipcode etc. for that lets do Liquibase scripts as below
1. Create another folder called “tenantgorup” under “resources/db”
2. Add “master.yaml” file and paste below code in it
databaseChangeLog:
    - include:
        file: db/tenantgroup/changesets/Building.yaml
3. Create new folder under “resource/db/tenantgroup” called “changesets” and file named “Building.yaml”. Then paste below code in it
databaseChangeLog:
 - changeSet:
     id: create-table-building
     author: Sunit
     changes:
       - createTable:
           tableName: building
           columns:
             - column:
                 name: id
                 type: bigint
                 autoIncrement: true
                 constraints:
                   primaryKey: true
             - column:
                 name: address
                 type: varchar(255)
             - column:
                 name: city
                 type: varchar(255)
             - column:
                 name: state
                 type: varchar(255)
             - column:
                 name: country
                 type: varchar(255)
             - column:
                 name: zipcode
                 type: varchar(255)
Now even if you run your application liquibase will not able to scan this scripts because we haven’t provided a “master” file path for scanning.
4. Create entity in Springboot project for called “Building” as below
import jakarta.persistence.*;
import lombok.Data;

@Entity
@Data
@Table(name = "building")
public class Building {

   @Id
   @GeneratedValue(strategy = GenerationType.IDENTITY)
   private Long id;

   private String address;
   private String city;
   private String state;
   private String country;
   private String zipcode;
}
5. Create BuildingRepository interface by extending JpaRepository like below
import com.sunitkale.multitentexample.entity.Building;
import org.springframework.data.jpa.repository.JpaRepository;
import org.springframework.stereotype.Repository;

@Repository
public interface BuildingRepository extends JpaRepository<Building, Long> {
}
6. Create BuildingService class as below
import com.sunitkale.multitentexample.entity.Building;
import com.sunitkale.multitentexample.repository.BuildingRepository;
import org.springframework.beans.factory.annotation.Autowired;
import org.springframework.stereotype.Service;

@Service
public class BuildingService {

   @Autowired
   private BuildingRepository buildingRepository;

   public void createBuilding(Building building) {
       buildingRepository.save(building);
   }
}
In the BuildingService, we will only have 1 method to save our building info.
Now we want to save our building info but before that our schema should get created automatically and after that it must have a Building table present.
We can do both of these tasks with the help of Liquibase and our previously created “tenant-schema” table.
Let’s create TenantSchemaService class and Test class to this job
1. Create TenantSchemaService class and paste below code(hiding imports for brevity)
@Service
public class TenantSchemaService {

   @Autowired
   private JdbcTemplate jdbcTemplate;
   @Autowired
   private TenantSchemaRepository tenantSchemaRepository;

   public void createSchemaAndTables() {
       tenantSchemaRepository.findAll().forEach(tenantGroup -> {
           try {
               // Create the new schema
               String sql = "CREATE SCHEMA IF NOT EXISTS " + tenantGroup.getSchemaName();
               jdbcTemplate.execute(sql);
               createLiquibase(tenantGroup.getSchemaName().toLowerCase());
           }
           catch (Exception e) {
               System.out.println(e);
           }
       });
   }

   private void createLiquibase(String schemaName) {
       try(Connection connection = jdbcTemplate.getDataSource().getConnection();
           Database database = DatabaseFactory.getInstance().findCorrectDatabaseImplementation(new JdbcConnection(connection));
       ) {
           database.setDefaultSchemaName(schemaName); // Set the default schema
           new Liquibase("db/tenantgroup/master.yaml", new ClassLoaderResourceAccessor(), database).update("");
       } catch (Exception e) {
           System.out.println(e);
       }
   }
}
2. To test this method, you can either create API or create Test class like below and hit the test button from IDE
@SpringBootTest
public class TenantSchemaServiceTest {

   @Autowired
   private TenantSchemaService tenantSchemaService;

   @Test
   public void createSchemaAndTables() {
       tenantSchemaService.createSchemaAndTables();
   }
}
With this implementation, you can see schema and their respective tables are created in database.
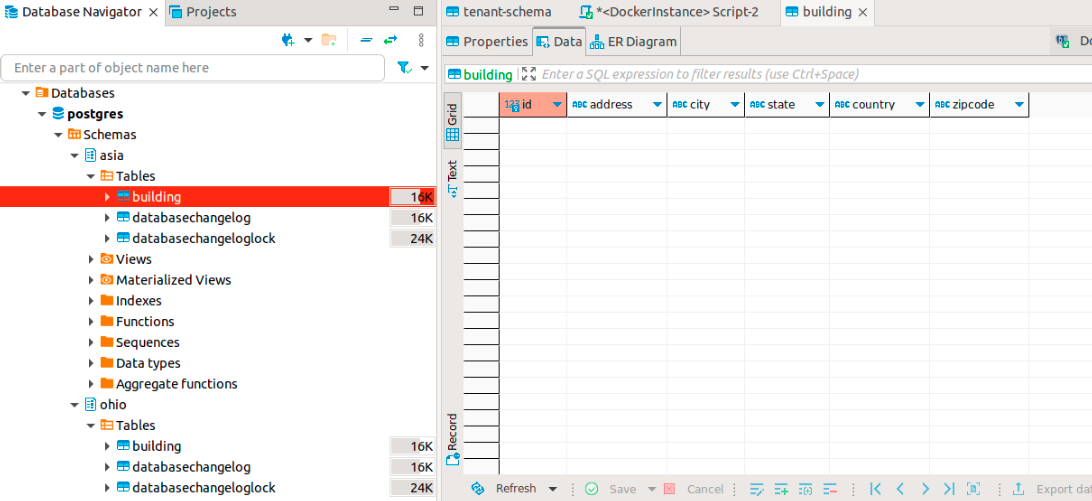
Now the tough job, is how our application can decide which data to store in which schema and how will JPA switch between Schema at runtime. For that we need to add configuration.
Create config package at root level in project
1. Add class called “DataSourceConfig” and paste below code
@Component
public class DataSourceConfig implements MultiTenantConnectionProvider, HibernatePropertiesCustomizer {
   @Autowired
   DataSource dataSource;

   @Override
   public Connection getAnyConnection() throws SQLException {
       return getConnection("PUBLIC");
   }

   ...more override methods hidden for brevity
}
2. Create “TenantIdentifierResolver” class and paste below code
@Component
public class TenantIdentifierResolver implements CurrentTenantIdentifierResolver, HibernatePropertiesCustomizer {

   private String currentTenant = "public";

   public void setCurrentTenant(String tenant) {
       currentTenant = tenant;
   }

   ...more overide methods hidden for brevity
}
With both of this class we can switch between Schemas at runtime. To test this, create Test class called BuildingServiceTest and paste below code
@SpringBootTest
class BuildingServiceTests {

  @Autowired
  private BuildingService buildingService;

  @Autowired
  TenantIdentifierResolver tenantIdentifierResolver;

  @Test
  void saveBuildingTest() {
     tenantIdentifierResolver.setCurrentTenant("asia");
     Building building = new Building();
     building.setAddress("Akurdi");
     building.setCity("Pune");
     building.setState("MH");
     building.setZipcode("401 411");
     building.setCountry("India");
     buildingService.createBuilding(building);
  }

}
Hit the test button, after successfully execution go the DBeaver and go to “asia” schema and click on view data of “building” table. You can see same data as below
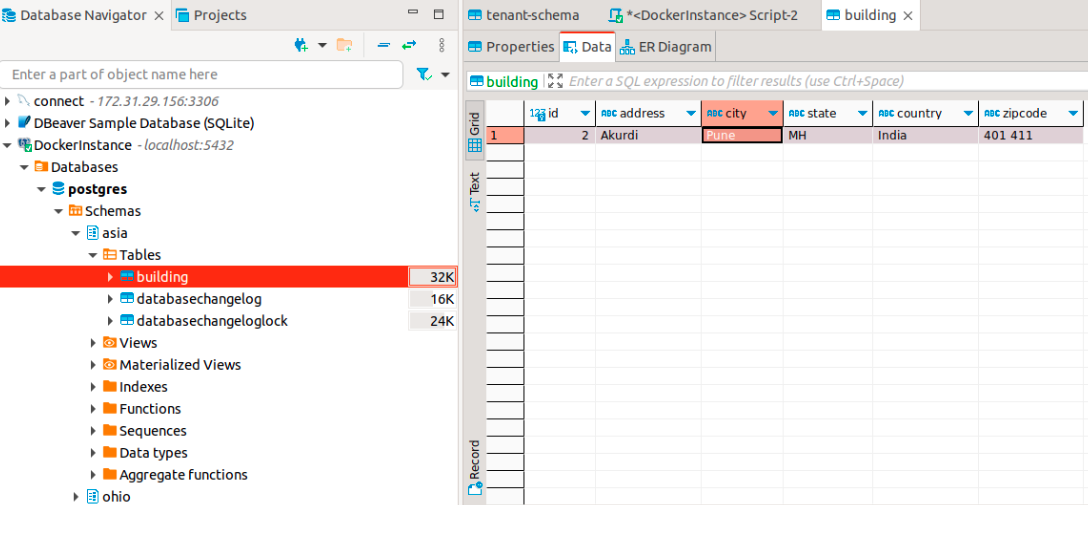
Congrats, you have learned how to structure your Spring Boot application for Multi-Tenant architecture.